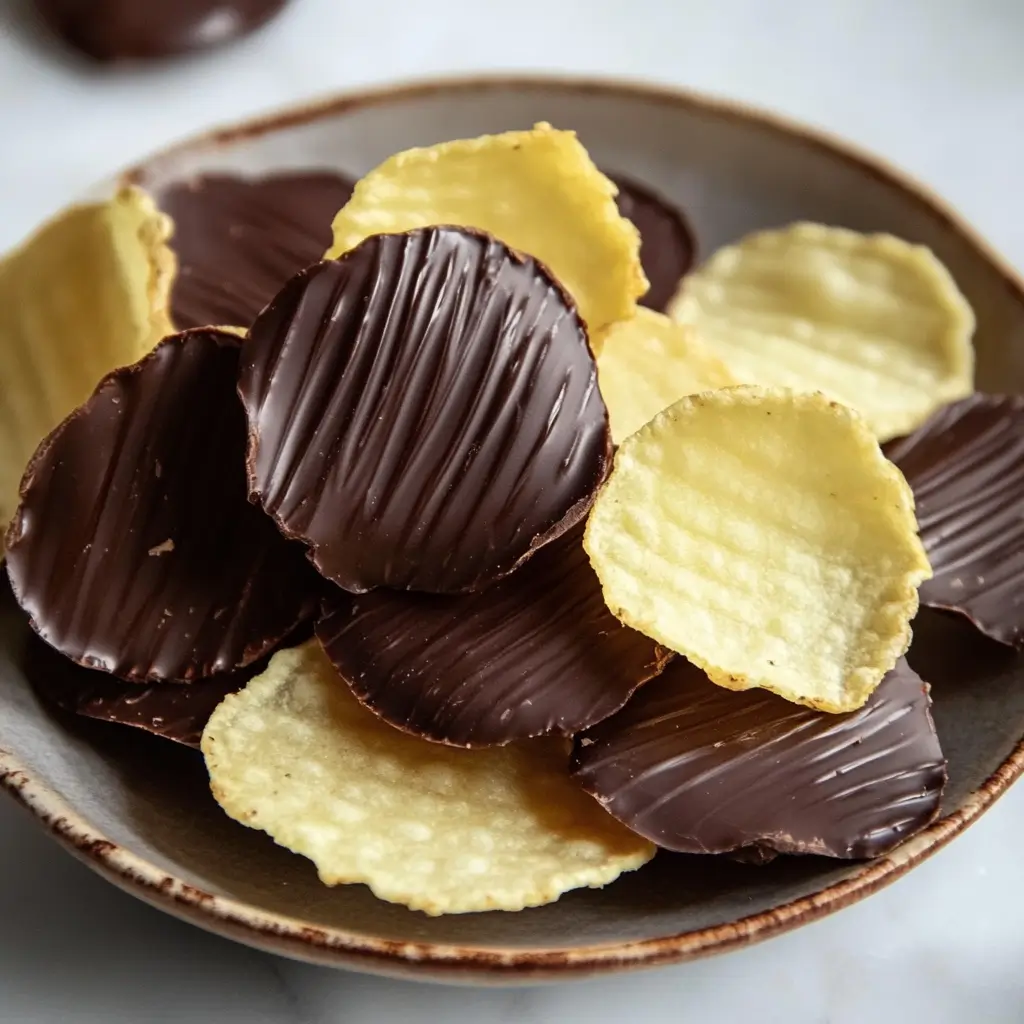
Introduction to Chocolate Covered Chips
If you’re a fan of the irresistible combination of sweet and salty, then chocolate covered chips are the snack for you. These crunchy, chocolate-coated delights take classic potato chips and elevate them with a smooth, rich layer of chocolate, creating a flavor explosion that satisfies both dessert lovers and salty snack enthusiasts.
In this article, we’ll explore everything there is to know about chocolate covered chips—why they’re so popular, how to make them at home, and the best store-bought options. We’ll also dive into expert tips for melting chocolate, creative flavor variations, and answers to frequently asked questions about chocolate-covered treats.
Table of Contents
What Are Chocolate Covered Chips?
The Perfect Blend of Sweet and Salty
Chocolate covered chips combine two classic flavors: the crisp, salty crunch of potato chips and the smooth, creamy texture of chocolate. The contrast between the salt and sugar triggers taste receptors in a way that makes these treats incredibly satisfying.
A Brief History of Sweet and Salty Snacks
While chocolate and salt have been paired together for centuries, the idea of coating potato chips in chocolate likely originated in gourmet candy shops looking to create a unique, indulgent treat. Today, major brands and small-batch chocolatiers alike have embraced the trend, offering a variety of chocolate-dipped chips with different types of chocolate and toppings.

Why Are Chocolate Covered Chips So Popular?
The Science Behind Sweet and Salty Cravings
Research shows that our taste buds are wired to enjoy both sweet and salty flavors. The combination enhances dopamine release in the brain, making it more pleasurable than eating just sweet or salty foods alone. This is why chocolate covered chips—and snacks like salted caramel or chocolate-covered pretzels—are so addictive.
How Texture Enhances Flavor Experience
The crispy texture of the chip combined with the smooth, velvety chocolate creates a sensory contrast that keeps each bite exciting. The best chocolate covered chips strike the perfect balance, ensuring that the chocolate coating complements rather than overwhelms the chip’s crunch.
How to Make Chocolate Covered Chips at Home
If you’re craving chocolate covered chips, the good news is that they’re incredibly easy to make at home. With just a few ingredients and some simple techniques, you can create this delicious snack in no time. Follow this step-by-step guide to make the perfect batch.
Ingredients Needed for Homemade Chocolate Covered Chips
To make chocolate-covered chips, you only need a handful of ingredients:
| Ingredient | Purpose |
|---|---|
| 1 bag of potato chips (ridged or plain) | Provides the crunchy, salty base |
| 1 ½ cups of chocolate (milk, dark, or white) | Forms the smooth, sweet coating |
| 1 tablespoon coconut oil or butter (optional) | Helps chocolate melt smoothly |
| Sea salt, crushed nuts, or sprinkles (optional) | Adds extra flavor and texture |
Best Potato Chips to Use:
- Ridged chips (like Ruffles) hold up well to chocolate.
- Kettle-cooked chips offer a strong crunch.
- Thin chips work but may break when dipping.
Step-by-Step Guide to Making the Perfect Batch
Step 1: Prepare Your Ingredients
- Lay out a baking sheet lined with parchment paper. This will prevent sticking and make cleanup easier.
- Choose your favorite chocolate—milk, dark, or white. Dark chocolate provides a bittersweet contrast, while milk chocolate is sweeter and creamier.
Step 2: Melt the Chocolate
- Microwave Method:
- Place chocolate chips in a microwave-safe bowl.
- Heat in 20-second intervals, stirring in between, until smooth.
- Add coconut oil or butter to improve consistency.
- Double Boiler Method:
- Fill a saucepan with 1 inch of water and bring it to a simmer.
- Place a heatproof bowl on top, making sure it doesn’t touch the water.
- Stir chocolate until fully melted and smooth.
Step 3: Dip the Potato Chips
- Hold each chip by one end and dip it into the melted chocolate.
- Use a fork to drizzle chocolate if you prefer a lighter coating.
- Lay dipped chips on the parchment-lined tray.
Step 4: Add Toppings (Optional)
- While the chocolate is still wet, sprinkle sea salt, chopped nuts, or crushed candy on top for extra flavor.
Step 5: Let the Chocolate Set
- Place the tray in the refrigerator for 15-20 minutes until the chocolate hardens.
- Store in an airtight container at room temperature for up to one week.
Choosing the Best Chocolate for Dipping Chips
The secret to perfect chocolate covered chips lies in selecting the right type of chocolate. Not all chocolate melts and coats chips the same way, so choosing the best one will ensure a smooth, glossy, and delicious finish.
Types of Chocolate: Milk, Dark, and White
Each type of chocolate creates a different flavor profile when paired with salty potato chips.
| Chocolate Type | Flavor Profile | Best For |
|---|---|---|
| Milk Chocolate | Sweet, creamy, smooth | Classic chocolate-covered chips |
| Dark Chocolate | Rich, slightly bitter, deep cocoa notes | Gourmet or less sweet options |
| White Chocolate | Sweet, buttery, vanilla-like | Unique flavor twists |
Which One Should You Use?
- Milk chocolate is the most popular because it balances sweetness with saltiness.
- Dark chocolate is ideal for those who prefer a bolder, less sugary taste.
- White chocolate works well for those who enjoy a sweet and creamy combination.
Can You Use Chocolate Chips for Melting and Dipping?
Yes, but with some precautions. Chocolate chips are designed to hold their shape in cookies, so they don’t melt as smoothly as chocolate bars or couverture chocolate.
How to Melt Chocolate Chips Properly
- Add coconut oil or butter to improve consistency.
- Use a microwave or double boiler to avoid burning.
- Stir constantly to ensure even melting.
For the best results, consider using high-quality baking chocolate instead of chocolate chips. Brands like Ghirardelli, Lindt, or Valrhona melt beautifully and create a professional finish.
Tips and Tricks for Perfect Chocolate Covered Chips
Making chocolate covered chips is easy, but a few expert tips can help you achieve smooth, glossy chocolate and crispy, flavorful chips every time. Here’s how to avoid common mistakes and elevate your homemade treats.
The Secret to Melting Chocolate Chips Correctly
Melting chocolate can be tricky—if done incorrectly, it can become lumpy, grainy, or even burn. Follow these tips for perfectly melted chocolate every time:
1. Use Low Heat
- Chocolate burns easily, so always melt it slowly using low heat.
- The best methods include the double boiler method or short microwave bursts (20 seconds at a time).
2. Stir Constantly
- Chocolate retains heat even after being removed from the heat source.
- Stir frequently to prevent overheating and ensure an even melt.
3. Add a Little Oil for Smoothness
- Chocolate chips contain stabilizers, which can make them thicker when melted.
- Add ½ to 1 tablespoon of coconut oil, butter, or vegetable shortening per cup of chocolate to create a smooth, dip-friendly consistency.
How to Avoid Common Mistakes When Coating Chips
Even the simplest recipes can go wrong without proper technique. Here’s how to avoid the most common chocolate dipping mistakes:
| Mistake | Why It Happens | How to Fix It |
|---|---|---|
| Chocolate is lumpy or grainy | Overheated or exposed to water | Melt chocolate slowly and avoid water contact |
| Chocolate doesn’t stick to chips | Chips are too oily or moist | Pat chips dry before dipping |
| Chocolate hardens too slowly | Room temperature is too warm | Refrigerate dipped chips for 15-20 minutes |
| Chocolate turns dull or has white streaks | Chocolate wasn’t tempered properly | Use high-quality chocolate and store correctly |
Pro Tip:
If your chocolate seizes (becomes thick and grainy), add ½ teaspoon of vegetable oil and stir vigorously to help restore smoothness.
Creative Variations and Flavor Twists
While classic chocolate covered chips are delicious on their own, adding unique flavors and toppings can take them to the next level. Whether you prefer a gourmet twist or a fun, festive touch, here are some creative ways to customize your chocolate-dipped chips.
Adding Nuts, Spices, and Drizzles
Enhance the flavor and texture of your chocolate covered chips with these simple but delicious add-ons:
| Topping | Flavor Profile | Best Chocolate Pairing |
|---|---|---|
| Crushed Almonds | Nutty, crunchy | Dark or milk chocolate |
| Sea Salt | Enhances sweetness | Any chocolate type |
| Crushed Pretzels | Extra salty and crunchy | Milk or white chocolate |
| Chili Powder | Spicy kick | Dark chocolate |
| Cinnamon | Warm and cozy | Milk or white chocolate |
| Caramel Drizzle | Buttery, sweet | Dark or milk chocolate |
| White Chocolate Drizzle | Creamy, sweet contrast | Dark or milk chocolate chips |
How to Apply Toppings:
- Before the chocolate sets, sprinkle your desired toppings over the dipped chips.
- For drizzles, melt white or caramel chocolate separately and use a fork or piping bag to create thin lines across the chips.
Pairing with Different Chip Flavors
Why stick to regular potato chips when you can experiment with different flavors? Try these fun pairings:
| Chip Flavor | Best Chocolate Pairing | Why It Works |
|---|---|---|
| Plain (classic) | Milk, dark, or white | Neutral base for any chocolate |
| BBQ | Dark chocolate | Smoky flavor pairs well with deep cocoa notes |
| Salt & Vinegar | White chocolate | The tanginess contrasts with the sweetness |
| Spicy (jalapeño, chili lime) | Dark chocolate | Heat and bitterness create balance |
| Cheddar | Milk chocolate | Sweet and cheesy for a bold contrast |
Pro Tip:
- If using flavored chips, pick ones with a light seasoning so they don’t overpower the chocolate.
- For extra crunch, mix different chip varieties in one batch!
How to Choose Quality Pre-Made Chocolate Chips
When shopping for chocolate covered chips, consider these key factors:
1. Chocolate Quality
- Look for real cocoa butter in the ingredients (not vegetable oil).
- Dark chocolate should have at least 60% cocoa content for a rich taste.
2. Freshness and Crunch
- Chips should remain crispy under the chocolate coating.
- Avoid brands that look stale or too soft.
3. Flavor Combinations
- Some brands offer unique flavors like sea salt, caramel drizzle, or peanut butter-infused chocolate.
- Try a few varieties to find your favorite!
Storage and Shelf Life of Chocolate Covered Chips
Proper storage is essential to keep chocolate covered chips fresh, crisp, and delicious. Whether you’ve made them at home or bought them from a store, following the right storage methods will ensure they last as long as possible without losing quality.
How Long Do Chocolate Covered Chips Stay Fresh?
The shelf life of chocolate covered chips depends on how they are stored:
| Storage Method | Estimated Shelf Life |
|---|---|
| Room Temperature (sealed container) | 1 to 2 weeks |
| Refrigerated (airtight container) | 3 to 4 weeks |
| Frozen (sealed bag or container) | Up to 3 months |
Best Ways to Store Chocolate Covered Chips
To keep your chocolate covered chips crispy and fresh, follow these storage tips:
1. Use an Airtight Container
- Store the chips in a sealed container to prevent moisture from making them soggy.
- If storing multiple layers, place parchment paper between layers to avoid sticking.
2. Keep Them in a Cool, Dry Place
- Avoid direct sunlight and heat, as this can cause the chocolate to melt.
- A pantry or cool kitchen cabinet is ideal for short-term storage.
3. Refrigerate for Longer Freshness
- If you live in a warm climate, store the chips in the refrigerator to prevent melting.
- Make sure the container is airtight to prevent the chocolate from absorbing odors.
4. Freeze for Long-Term Storage
- For extended storage, place the chips in a zip-top freezer bag and remove excess air before sealing.
- When ready to eat, let them thaw at room temperature for 10–15 minutes to avoid condensation.
How to Tell If Chocolate Covered Chips Have Gone Bad
Although chocolate has a long shelf life, chocolate-covered snacks can degrade over time. Look for these signs that your chocolate covered chips may no longer be fresh:
| Sign | What It Means |
|---|---|
| White streaks or spots (chocolate bloom) | The cocoa butter has separated, but it’s still safe to eat. |
| Soft or stale chips | Moisture has affected the crunchiness. |
| Unpleasant smell or taste | The chocolate or chips have absorbed odors or gone rancid. |
Pro Tip:
- If your chocolate has white streaks (fat bloom), it’s still safe to eat, but the texture may be slightly different.
FAQs About Chocolate Covered Chips
Many people have questions about chocolate covered chips, from what they’re called to the best way to melt chocolate. Here are answers to some of the most frequently asked questions.
1. What are chocolate covered chips called?
Chocolate covered chips are often referred to as:
- Chocolate-dipped potato chips
- Chocolate-coated chips
- Sweet and salty chips
Some gourmet brands may use unique names, but they all describe the same delicious snack—crispy potato chips coated in smooth chocolate.
2. How far in advance can I make chocolate covered strawberries?
Although this question relates to chocolate covered strawberries, the same storage principles apply to chocolate covered chips. You can make chocolate covered strawberries up to 24 hours in advance, but they are best when eaten the same day. Store them in an airtight container in the refrigerator, and avoid moisture buildup by placing a paper towel at the bottom of the container.
For chocolate covered chips, you can make them up to two weeks in advance if stored properly in a sealed container at room temperature.
3. Can you use chocolate chips for melting and dipping?
Yes, you can use chocolate chips for melting and dipping, but they need a little help for the best consistency. Chocolate chips are designed to hold their shape when baked, so they don’t melt as smoothly as chocolate bars or couverture chocolate.
Tips for Melting Chocolate Chips for Dipping:
- Add ½ to 1 tablespoon of coconut oil or butter per cup of chocolate chips to improve the texture.
- Use low heat and stir frequently to prevent burning.
- Melt in 20-second microwave intervals or use a double boiler for even heating.
4. What is the secret to melting chocolate chips?
The secret to perfectly melted chocolate chips is gentle heat and constant stirring. Here’s how to do it right:
Best Methods for Melting Chocolate Chips:
Microwave Method:
- Place chocolate chips in a microwave-safe bowl.
- Heat in 20-second intervals, stirring each time.
- Stop when the chocolate is 90% melted, then stir until smooth.
Double Boiler Method:
- Fill a saucepan with 1 inch of water and bring to a simmer.
- Place a heatproof bowl over the pan, ensuring it doesn’t touch the water.
- Stir chocolate chips constantly until fully melted.
Pro Tip:
- Avoid getting water in the chocolate, as this can cause it to seize (turn grainy and thick).
- Always stir gently to prevent overheating.
Conclusion: Why You Should Try Chocolate Covered Chips Today
Chocolate covered chips are the perfect balance of sweet and salty, making them a delicious treat for any occasion. Whether you make them at home or buy a pre-made version, they are sure to satisfy your cravings.
Final Thoughts and Recommendations:
- Make them at home for a customizable and fresh experience.
- Try different chocolates and toppings for unique flavor combinations.
- Store them properly to keep them crisp and delicious for weeks.
So, what are you waiting for? Grab some chips, melt some chocolate, and enjoy this irresistible sweet and salty snack!
Mini Chocolate Chip Muffins → Check out another delicious chocolate treat here: Mini Chocolate Chip Muffins
Sourdough Chocolate Chip Muffins → Discover a unique twist on chocolate muffins: Sourdough Chocolate Chip Muffins